terraform으로 aws 인프라 구축하기 (2) (Auto Scaling)
시리즈 1에서는 ec2와 보안 그룹까지 생성했습니다. 이제 변수 설정과 오토 스케일링이 가능한 웹 서버 클러스터를 구축해 보겠습니다.
변수 설정하는 방법
변수를 선언할 때는 variable 블록을 사용합니다.
//숫자인 변수
variable "number_example" {
  description = "An example of a number variable in Terraform"
  type = number
  default = 42
}
//list인 변수
variable "list_example" {
 description = "An example of a list in Terraform"
 type = list
 default = ["a", "b", "c"]
}
변수 적용하기
변수를 설정한 후에는 var.변수명 형식으로 변수를 참조할 수 있습니다.
//variable.tf

variable "server_port" {
 description = "The port the server will use for HTTP requests"
 type = number
 default = 8080
}

//ec2.tf

resource "aws_security_group" "instance" {
 name = "terraform-example-instance"
 ingress {
 from_port = var.server_port
 to_port = var.server_port
 protocol = "tcp"
 cidr_blocks = ["0.0.0.0/0"]
 }
}
변수를 적용하면 코드의 유연성과 재사용성을 높일 수 있습니다.
Auto Sacling 구축하기
Auto Scaling Group에서는 user_data_replace_on_change와 tag를 지원하지 않습니다.
//asg.tf

resource "aws_autoscaling_group" "terraform" {
  launch_configuration = aws_instance.terraform.name
  min_size = 2
  max_size = 3
  tag {
    key = "Name"
    value = "terraform-asg"
    propagate_at_launch = true
  }
}
인스턴스는 생성될 때 terraform-asg이라는 태그가 지정됩니다. ASG가 시작 구성 이름을 참조하는 방식 때문에 문제가 발생할 수 있습니다.
시작 구성은 변경할 수 없으므로 매개변수를 수정하면 Terraform이 교체하려고 시도합니다. 그러나 ASG는 이전 리소스를 참조하기 때문에 삭제가 어렵습니다.
create_before_destroy = true로 설정하면 Terraform이 먼저 대체 리소스를 생성한 후 참조를 업데이트하고, 이전 리소스를 삭제하여 문제를 방지합니다.
//asg.tf

resource "aws_launch_configuration" "asg_terraform" {
  image_id = "ami-0f3a440bbcff3d043"
  instance_type = "t2.micro"
  security_groups = [aws_security_group.instance.id]

  user_data = <<-EOF
    #!/bin/bash
    echo "Hello, World" > index.html
    nohup busybox httpd -f -p ${var.server_port} &
  EOF

  lifecycle {
   create_before_destroy = true
 }
}
ASG가 작동하도록 하려면 subnet_ids를 추가해줘야 합니다. 이 매개변수는 EC2 인스턴스가 배포되어야 하는 VPC 서브넷의 ASG를 지정합니다.
먼저 기본 VPC에 대한 데이터를 조회하는 코드를 작성하겠습니다.
//vpc.tf

data "aws_vpc" "default" {
 default = true
}

data "aws_subnets" "default" {
 filter {
 name = "vpc-id"
 values = [data.aws_vpc.default.id]
 }
}
vpc_zone_identifier 인수를 통해 해당 서브넷을 사용할 수 있습니다.
//asg.tf

resource "aws_autoscaling_group" "terraform" {
  launch_configuration = aws_instance.terraform.name
  vpc_zone_identifier = data.aws_subnets.default.ids
  min_size = 2
  max_size = 3
  tag {
    key = "Name"
    value = "terraform-asg"
    propagate_at_launch = true
  }
}
로드 밸런서 배포하기
모든 사용자의 트래픽은 로드 밸런서를 통해 들어오고 로드밸런서를 통해 분산된 서버에 트래픽을 분산 시킵니다.
alb 생성하기
subnets 파라미터로 default vpc의 서브넷을 지정해줍니다.
//asg.tf

resource "aws_lb" "example" {
 name = "terraform-asg-example"
 load_balancer_type = "application"
 subnets = data.aws_subnets.default.ids
}
alb 리스너 생성하기
기본 HTTP 포트인 포트 80에서 수신 대기하고, HTTP를 프로토콜로 사용하고, 리스너 규칙과 일치하지 않는 요청에 대한 기본 응답으로 간단한 404 페이지를 보내도록 ALB를 구성합니다.
//asg.tf

resource "aws_lb_listener" "http" {
  load_balancer_arn = aws_lb.terraform.arn
  port = 80
  protocol = "HTTP"
  # By default, return a simple 404 page
  default_action {
    type = "fixed-response"
    fixed_response {
    content_type = "text/plain"
    message_body = "404: page not found"
    status_code = 404
    }
 }
}
ALB 전용으로 새 보안 그룹을 생성하기
HTTP를 통해 로드 밸런서에 액세스할 수 있도록 포트 80에서 들어오는 요청을 허용하고 로드 밸런서가 상태 확인을 수행할 수 있도록 모든 포트에서 나가는 요청을 허용해야 합니다.
//asg.tf

resource "aws_security_group" "alb" {
  name = "terraform-alb"

  ingress {
    from_port = 80
    to_port = 80
    protocol = "tcp"
    cidr_blocks = ["0.0.0.0/0"]
  }

  egress {
    from_port = 0
    to_port = 0
    protocol = "-1"
    cidr_blocks = ["0.0.0.0/0"]
  }
}
security_groups 인수를 통해 이 보안 그룹을 사용하도록 aws_lb 리소스에 알려야 합니다.
//asg.tf

resource "aws_lb" "terraform" {
  name = "terraform-asg"
  load_balancer_type = "application"
  subnets = data.aws_subnets.default.ids
  security_groups = [aws_security_group.alb.id]
}
aws_lb_target_group 리소스를 사용하여 ASG에 대한 대상 그룹을 생성
대상 그룹은 정기적으로 각 인스턴스에 HTTP 요청을 보내 인스턴스의 상태를 확인합니다.
//asg.tf

resource "aws_lb_target_group" "asg" {
  name = "terraform-asg"
  port = var.server_port
  protocol = "HTTP"
  vpc_id = data.aws_vpc.default.id
  health_check {
    path = "/"
    protocol = "HTTP"
    matcher = "200"
    interval = 15
    timeout = 3
    healthy_threshold = 2
    unhealthy_threshold = 2
  }
}
target_group_arns 인수가 새 대상 그룹을 가리키도록 설정합니다.
health_check_type을 "ELB"로 업데이트해야 합니다. 기본 health_check_type은 "EC2" 입니다.
//asg.tf

resource "aws_autoscaling_group" "terraform" {
  launch_configuration = aws_launch_configuration.asg_terraform.name
  vpc_zone_identifier = data.aws_subnets.default.ids
  target_group_arns = [aws_lb_target_group.asg.arn]
  health_check_type = "ELB"
  min_size = 2
  max_size = 3
  tag {
    key = "Name"
    value = "terraform-asg"
    propagate_at_launch = true
  }
}
ASG가 포함된 대상 그룹에 대한 경로와 일치하는 요청을 보내는 리스너 규칙을 추가합니다.
//asg.tf

resource "aws_lb_listener" "http" {
  load_balancer_arn = aws_lb.terraform.arn
  port = 80
  protocol = "HTTP"
  # By default, return a simple 404 page
  default_action {
    type = "fixed-response"
    fixed_response {
    content_type = "text/plain"
    message_body = "404: page not found"
    status_code = 404
    }
 }
}
ALB의 DNS 이름 출력 하는 코드를 추가합니다.
//asg.tf

output "alb_dns_name" {
 value = aws_lb.terraform.dns_name
 description = "load balancer"
}
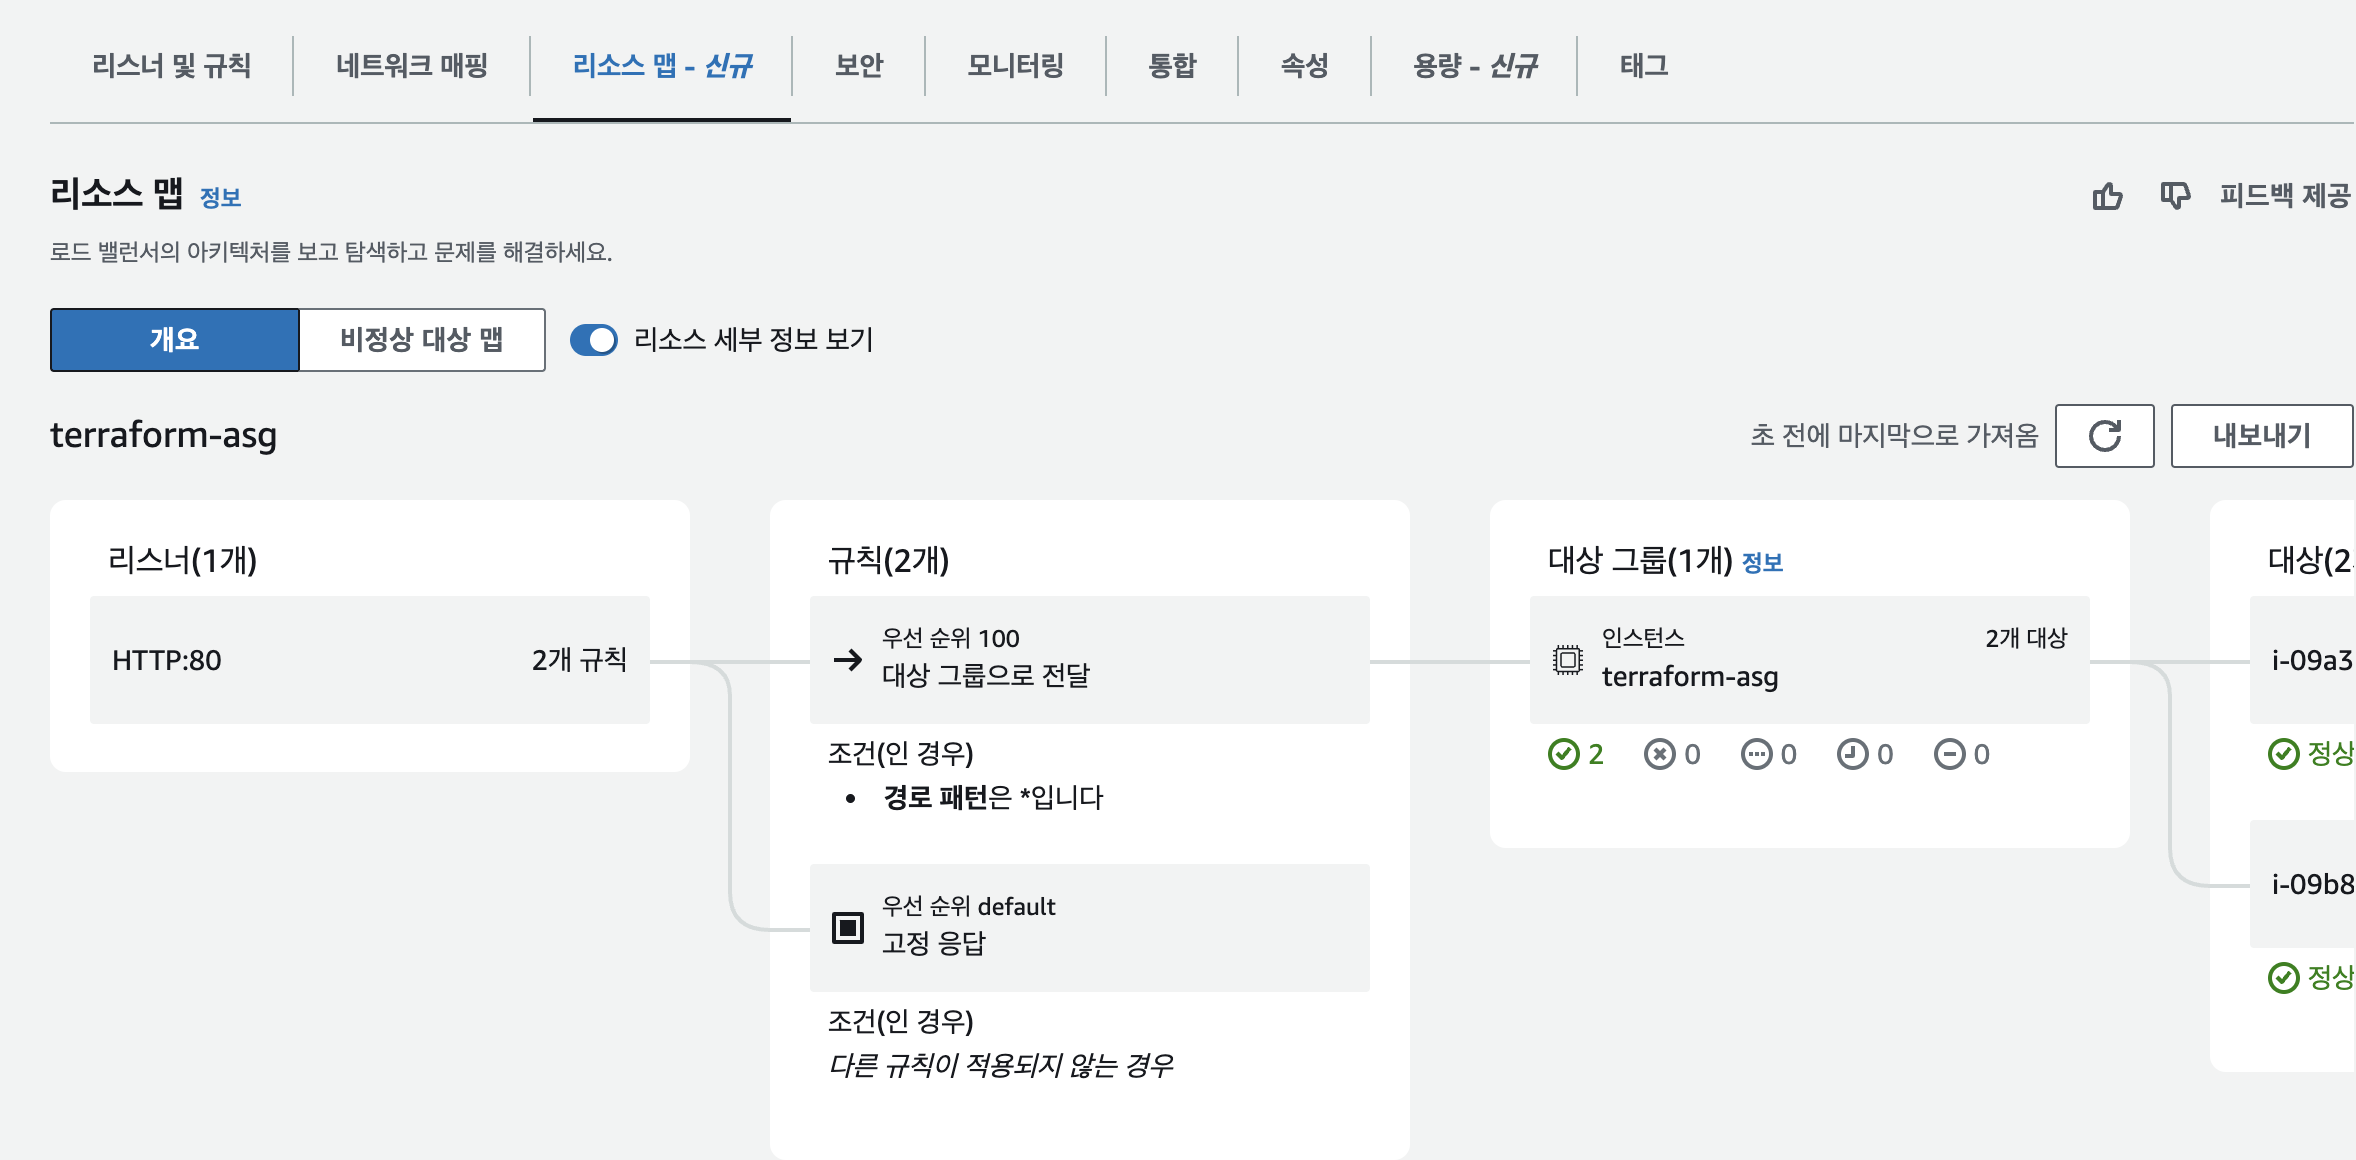
이제 terraform apply를 하면 정상적으로 Auto Scaling 가능한 클러스터가 생성된 것을 확인할 수 있습니다.